
To lay paving slabs successfully, prepare a stable compacted sub-base, create the correct drainage fall and install every slab on a continuous full mortar bed. Natural stone normally benefits from a bonding slurry on the underside, while low-porosity porcelain paving requires a suitable slurry primer or bonding bridge to achieve reliable adhesion to the mortar.
The paving itself is only the visible part of a patio. Most long-term problems originate underneath it. Rocking slabs, cracked joints, standing water, staining and movement are commonly associated with poor ground preparation, insufficient support or incorrect bonding rather than the paving material alone.
This Paving Slabs Direct guide provides a practical installation reference for homeowners, landscapers and trade customers using paving slabs for patios, garden paths and other pedestrian landscaping projects.
Watch How Paving Slabs Are Laid
The two videos below provide useful visual references for patio preparation and paving installation. They should be used together with the material-specific guidance and site requirements described in this article.
What Is the Correct Build-Up for a Garden Patio?
For a typical domestic pedestrian patio, the paving should be treated as a complete construction system rather than simply a layer of slabs placed over the ground.
| Layer | Typical Specification | Main Purpose |
|---|---|---|
| Paving Slab | Thickness depends on material and product | Finished walking surface |
| Full Mortar Bed | Approximately 30–40 mm after bedding | Supports and levels the slab |
| Compacted Sub-Base | Often around 100 mm MOT Type 1 for a normal domestic patio | Provides structural stability and spreads loads |
| Formation | Firm, stable excavated ground | Supports the complete patio construction |
These figures are useful references for a normal domestic patio rather than a universal engineering specification. Soft ground, made-up ground, drainage problems, retaining structures or heavier loading can require a different build-up.
Do Not Lay Paving Slabs Directly on Soil
Laying paving directly onto soil may appear to reduce cost and preparation time, but it normally creates an unstable permanent patio.
Natural soil moves as moisture conditions change, while organic topsoil can compress and settle over time. Without a stable supporting layer, slabs may move independently, rock underfoot or create low areas where water collects.
For a permanent patio, remove vegetation, roots, topsoil and loose material until a firm formation is reached, then construct a properly compacted sub-base.
Use a Proper Compacted Sub-Base
MOT Type 1 is commonly used beneath UK patios because its mixture of particle sizes allows it to compact into a stable supporting layer.
For many domestic pedestrian patios, approximately 100 mm of compacted sub-base is a practical reference. It should normally be placed and compacted progressively rather than installed as one deep loose layer.
A plate compactor should be used to consolidate the aggregate thoroughly. Major changes in level should be corrected in the formation and sub-base rather than relying on an excessively thick mortar bed later.
Plan the Drainage Before Laying the First Slab
A patio should normally fall away from the building rather than direct surface water towards it.
A practical fall for many domestic patios is around 1:60 to 1:80, depending on the paving surface and drainage arrangement.
- 1:60: approximately 16.7 mm fall per metre
- 1:80: approximately 12.5 mm fall per metre
For example, over a 4 metre patio, a 1:80 fall gives approximately 50 mm of total level difference.
Set the high and low points with string lines or a laser before laying begins. Water should discharge towards an appropriate permeable area, channel or drainage outlet rather than against the building or onto neighbouring property.
Keep Paving Below the Damp Proof Course
Where paving is installed next to a building, the finished surface should normally remain approximately 150 mm below the damp proof course, unless an alternative drainage detail has been specifically designed.
Also check:
- Air bricks
- Door thresholds
- Ventilation openings
- Drainage channels
- Inspection covers
- Downpipes
Do not raise the finished patio simply to avoid excavation if doing so creates a moisture or drainage problem around the building.
Always Use a Full Mortar Bed
Paving slabs should be supported across the complete underside by a full mortar bed.
Dot-and-dab, spot bedding and isolated rings of mortar leave unsupported voids under the slab. These voids can contribute to:
- Rocking slabs
- Localised stress
- Cracking
- Uneven settlement
- Hollow areas
- Uneven moisture patterns
A continuous mortar bed distributes loads more evenly and allows the paving to be brought accurately to the required line, level and drainage fall.
What Mortar Mix Should Be Used for Paving Slabs?
A common bedding mortar for natural stone paving is approximately 1 part cement to 4 or 5 parts sharp sand by volume.
The mortar should be moist and cohesive rather than fluid. It needs enough moisture to compact and bond properly while remaining firm enough to hold the slab at the required level.
Mortar that is excessively wet can shrink, become difficult to control and increase the risk of cement contamination. A mix that is too dry may not consolidate or bond properly.
Does Natural Stone Need Slurry Primer?
A suitable bonding slurry is strongly recommended on the underside of calibrated natural stone paving. It improves adhesion between the stone and mortar and helps reduce the risk of slabs becoming loose or hollow.
For Indian sandstone paving, remove loose dust from the underside and apply a continuous coating immediately before placing the slab into the wet mortar.
The slurry should still be wet and active when the slab is installed. Do not prime large numbers of slabs in advance and allow the coating to dry.
Porcelain Paving Must Be Properly Primed
Porcelain behaves differently from sandstone because it has extremely low water absorption.
Traditional mortar alone should not be relied upon to bond adequately to the underside of dense porcelain. When porcelain is laid over a mortar bed, a suitable proprietary slurry primer or bonding bridge should therefore be applied across the full underside.
This is one of the most important differences between laying natural stone and porcelain paving.
| Installation Point | Natural Stone | Porcelain |
|---|---|---|
| Full Mortar Bed | Yes | Yes |
| Back Priming | Strongly recommended | Essential for a reliable bonded installation |
| Cutting | Suitable masonry or diamond equipment | Good-quality porcelain diamond blade required |
| Thickness Variation | May vary according to stone and processing | Normally very consistent |
| Joint Width | Depends on edge finish and tolerance | Usually narrower and more controlled |
How to Lay the First Paving Slab
The first slab establishes the working level and drainage fall for the rest of the patio, so it should be positioned carefully.
- Spread enough mortar to provide complete support under the slab.
- Apply the appropriate bonding primer to the underside.
- Lower the slab carefully into position.
- Tap it down with a rubber mallet.
- Check the slab across both directions.
- Confirm that the required drainage fall is maintained.
- Lift and reset the slab if major adjustment is required.
Do not repeatedly strike one corner in an attempt to correct a badly prepared bedding layer.
What Joint Width Should Be Used?
The correct joint width depends on the paving material and the way the edges have been manufactured.
Hand-cut or naturally riven sandstone normally needs wider joints because individual slab dimensions can vary slightly. Around 10–15 mm is common for many traditional sandstone products.
Sawn natural stone and rectified porcelain can usually use narrower and more controlled joints, subject to the individual product and jointing-system requirements.
Blend Natural Stone Before and During Installation
Natural stone varies in colour, tone, mineral marking and surface texture.
Do not complete one crate before opening the next. Open and inspect the paving before installation and blend material from different crates as the patio progresses.
This distributes normal geological variation across the whole project rather than concentrating one colour or tone in a particular area.
Plan the Patio Laying Pattern Before Starting
The laying pattern affects appearance, cutting quantities, joint positions and material waste.
Single-size paving can be installed in layouts such as:
- Stack bond
- Running bond
- Half bond
- Third bond
Mixed-size Indian sandstone patio packs should follow a planned module rather than being laid completely at random.
Before mixing mortar, dry-plan enough paving to understand how the pattern reaches walls, steps and perimeter edges. A small change in the starting position can often avoid narrow or awkward cuts later.
Mixed-Size Patio Packs Are Not Random
A common installation mistake is to treat a four-size or five-size patio pack as a random selection of slabs that can simply be placed wherever they fit.
The different quantities are normally designed to work together within a repeating laying module. If one convenient size is used too quickly, the remaining slabs may become difficult to arrange later.
When working with mixed-size paving:
- Check the quantity of each slab size before starting.
- Keep the laying pattern visible on site.
- Avoid four slab corners meeting at one point where practical.
- Avoid unnecessarily long continuous joints.
- Distribute both slab sizes and natural colours across the patio.
- Do not use all of one size at the beginning.
Patio Pack Laying Patterns
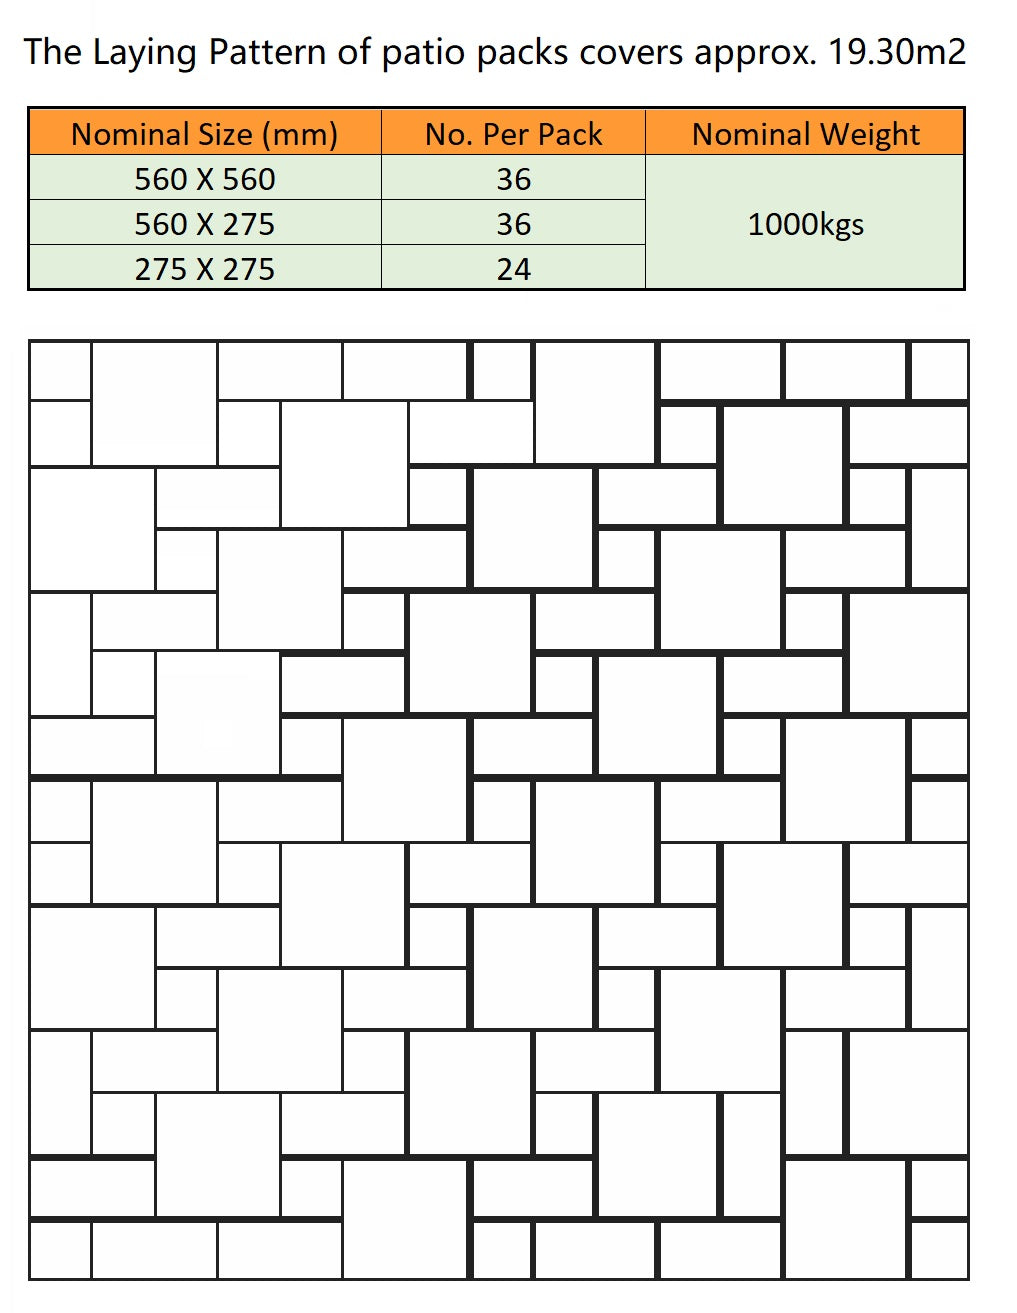
The four reference patterns below cover common 600 Series and 560 Series patio packs. On desktop they are displayed two per row; on mobile they stack vertically for easier viewing.
600 Series – 4 Size Patio Pack Pattern (18.90 m²)

600 Series – 4 Size Patio Pack Pattern (15.30 m²)

560 Series – 5 Size Patio Pack Pattern (15.76 m²)

560 Series – 3 Size Patio Pack Pattern (19.30 m²)
Cut Paving Slabs Safely
Measure every cut carefully and allow for the intended joint width before marking the paving.
Use appropriate cutting equipment and a suitable diamond blade for the material. Porcelain, granite and sandstone do not necessarily require the same blade specification.
Cutting stone, concrete and mortar can generate respirable crystalline silica dust. Appropriate dust suppression and PPE should therefore be used, including suitable respiratory, eye and hearing protection.
Keep the cutting area away from finished paving, windows, doors and vehicles because stone and cement dust can be difficult to remove once deposited.
Keep Mortar and Slurry Primer Off the Surface
Cement contamination is much easier to prevent than remove later.
If mortar, cement slurry or primer reaches the visible surface, clean it promptly with clean water and a suitable soft brush or sponge before it hardens.
Do not repeatedly wipe dirty cement water across the paving. Change the cleaning water frequently.
Strong acid cleaners should not be treated as a routine solution. They can damage cement joints and alter some natural stones, particularly calcium-rich materials such as limestone.
Allow the Bedding to Cure Before Jointing
Do not rush onto newly installed paving simply because the visible surface looks dry.
The mortar underneath needs sufficient time to stabilise before foot traffic or jointing work begins. Required curing time depends on temperature, moisture, mortar composition and exposure.
Cold and wet weather generally slows curing. Fresh paving should also be protected from frost and heavy rain where necessary.
Joint the Patio Properly
Once the paving is sufficiently stable, complete the joints using a suitable external jointing method.
Common options include:
- Traditional mortar pointing
- Proprietary paving jointing compounds
Whichever system is selected, joints should be properly filled to the required depth rather than creating only a thin cosmetic surface layer.
Always follow the jointing-product manufacturer's requirements for joint width, depth, moisture conditions and curing.
Do Paving Slabs Need Sealing?
Sealing depends on the paving material and the maintenance regime required.
Porcelain normally does not need conventional stone sealing because of its extremely low absorption.
Natural sandstone, limestone and other stones may be treated with a compatible breathable natural-stone sealer where additional stain resistance is desired.
Sealing is optional for many natural stones and should never be treated as a substitute for correct drainage, bedding and maintenance.
Common Paving Slab Laying Mistakes
- Laying directly onto soil or an unstable base
- Insufficient excavation
- Poorly compacted sub-base
- No planned drainage fall
- Directing water towards the building
- Raising paving too close to the damp proof course
- Using dot-and-dab or spot bedding
- Leaving voids beneath slabs
- Omitting slurry primer
- Allowing slurry primer to dry before laying
- Using excessively wet bedding mortar
- Trying to correct a poor sub-base with an overly thick mortar bed
- Using joints that are too narrow for hand-cut natural stone
- Laying a mixed-size patio pack randomly
- Failing to blend natural stone from different crates
- Allowing mortar or primer to dry on the visible surface
- Jointing before the bedding has stabilised
- Sealing paving while it is still damp or contaminated
Final Patio Installation Checklist
- The formation is stable and free from unsuitable organic material.
- The sub-base is properly compacted.
- The finished level has been checked against the building and DPC.
- The patio falls towards a suitable drainage point.
- Every slab is supported by a full mortar bed.
- The slab underside has been correctly primed where required.
- Natural stone has been blended across the patio.
- Joint widths suit the actual paving format.
- Mixed-size packs follow a planned laying pattern.
- No installed slab rocks or has obvious unsupported areas.
- Mortar and slurry contamination has been removed promptly.
- The bedding has cured sufficiently before jointing and trafficking.
- The finished joints are full and secure.
Paving Slabs Laying FAQ
How deep should I dig for a garden patio?
For a typical pedestrian patio, total excavation may be around 150–170 mm below finished paving level where the construction includes approximately 100 mm of compacted sub-base, 30–40 mm of mortar and the paving slab itself. Actual depth depends on slab thickness, ground conditions and site design.
How thick should the mortar bed be?
A full mortar bed of approximately 30–40 mm after bedding is commonly used for domestic natural stone paving. The bed should provide continuous support beneath the slab rather than isolated spots.
What mortar mix should I use for paving slabs?
A common natural-stone bedding mix is approximately 1 part cement to 4 or 5 parts sharp sand by volume. The mix should be workable and cohesive rather than excessively wet.
Can I lay paving slabs directly onto soil?
Not for a properly constructed permanent patio. Soil can move and compress as moisture conditions change, so a stable compacted sub-base and suitable bedding system should normally be installed first.
Can I use dot-and-dab for paving slabs?
Dot-and-dab is not recommended. It leaves unsupported voids beneath the paving and can contribute to movement, cracking, hollow areas and uneven moisture patterns.
Do Indian sandstone slabs need slurry primer?
A continuous bonding slurry on the underside of calibrated Indian sandstone is strongly recommended because it improves adhesion between the stone and the mortar bed.
Does porcelain paving need slurry primer?
Yes. When porcelain is laid on a traditional mortar bed, a suitable proprietary slurry primer or bonding bridge should be applied across the underside because porcelain has extremely low water absorption.
What fall should a patio have?
A fall of approximately 1:60 to 1:80 is commonly practical for domestic patios, provided the finished surface drains effectively away from the building towards a suitable outlet.
How far below the DPC should paving be?
External paving is normally kept approximately 150 mm below the damp proof course unless a properly designed alternative drainage detail allows otherwise.
How wide should sandstone paving joints be?
Riven or hand-cut Indian sandstone commonly uses joints around 10–15 mm wide because slab edges naturally vary. Sawn stone and porcelain can usually use narrower, more controlled joints.
Should I mix sandstone slabs from different crates?
Yes. Natural stone should normally be blended from different crates so that natural colour, tone and geological variation are distributed across the completed patio.
Can paving slabs be laid over an existing concrete base?
They can be installed over suitable existing concrete where the base is sound, stable, correctly positioned and capable of draining properly. The new paving must still use an appropriate bonded bedding system.
How much extra paving should I order?
Around 10% extra is commonly sensible for straightforward patios. Projects involving curves, diagonal layouts or substantial cutting may require approximately 12–15% depending on the design.
When can I walk on newly laid paving?
Only after the bedding mortar has cured sufficiently to prevent movement. There is no single reliable time for every project because temperature, moisture and mortar conditions influence curing.
Does natural stone paving need sealing?
Not necessarily. A suitable breathable natural-stone sealer can reduce staining and make some surfaces easier to maintain, but sealing is optional for many paving stones and does not replace correct installation or drainage.
Practical Advice from Paving Slabs Direct
Paving Slabs Direct supplies paving to homeowners, landscapers and trade customers, but the long-term quality of a patio ultimately depends on how the material is installed.
Our practical approach is straightforward: select paving according to its intended use, understand the material before installation, prepare the ground correctly and do not remove essential stages such as sub-base compaction, full-bed laying or back priming simply to save time.
Different paving materials behave differently. Sandstone, limestone, granite and porcelain vary in density, absorption, surface finish and cutting characteristics, so installation methods should be adjusted to the actual material rather than assuming every paving slab can be treated in exactly the same way.
Disclaimer: This guide provides general installation guidance for domestic paving projects. Ground conditions, drainage, loading, building details and individual product specifications vary between sites. The installer remains responsible for assessing the project and selecting an appropriate construction system. Where conditions are uncertain, obtain advice from an experienced landscaper, builder or other suitably competent professional before work begins.


